Oreo Dirt Cake – Easy No-Bake Chocolate Dessert
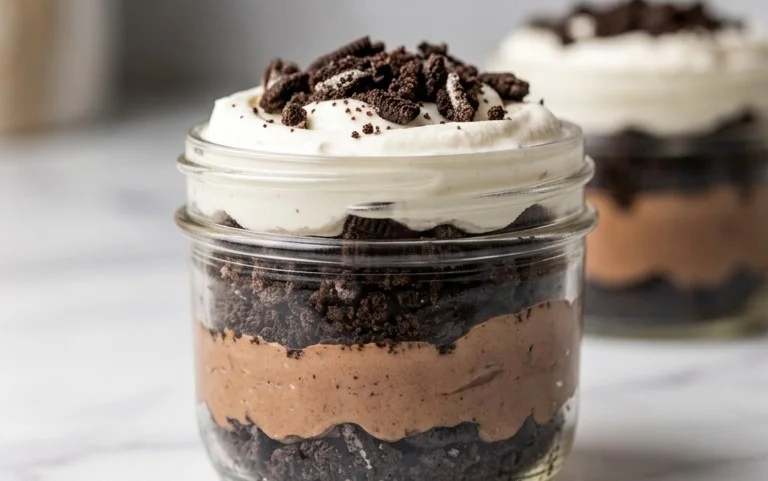
Oreo Dirt Cake is a nostalgic dessert that instantly transports me back to childhood slumber parties and summer barbecues. It’s the kind of treat that elicits smiles and happy sighs with every spoonful. What makes Oreo Dirt Cake so utterly irresistible? It’s the perfect marriage of textures and flavors: the rich, crumbly cookie base mimicking rich soil, layered with a luxuriously smooth, creamy pudding, and then topped with even more crushed Oreos for that authentic “dirt” effect. It’s delightfully simple to make, yet it looks and tastes like something truly special. Whether you’re looking for a fun family activity or a crowd-pleasing dessert for your next gathering, this Oreo Dirt Cake recipe is guaranteed to be a hit. Get ready to dig in and relive those sweet memories!
Oreo Dirt Cake
Get ready to dig into a dessert that’s as fun to make as it is to eat! Oreo Dirt Cake is a timeless classic, a no-bake wonder that’s perfect for potlucks, parties, or simply satisfying a serious chocolate craving. This recipe takes the traditional layered dessert and elevates it with a rich, fudgy chocolate cake base, creating an irresistible treat that everyone will love. It’s surprisingly simple to assemble, making it a fantastic option for bakers of all skill levels, even those just starting out. The combination of creamy pudding, decadent hot fudge, crushed Oreos, and light whipped topping creates a symphony of textures and flavors that will have you coming back for more.
Ingredients:
- 1 box chocolate cake mix (plus ingredients required on the back of the box, typically eggs, oil, and water)
- 12.8 oz hot fudge sauce
- 3.4 oz instant chocolate pudding mix
- 1 3/4 cups milk
- 30 Oreo cookies (crushed)
- 3.4 oz instant chocolate pudding mix
- 1 3/4 cup milk
- 8 oz cool whip, thawed
Preparing the Chocolate Cake Base
The foundation of our delicious dirt cake is a rich, moist chocolate cake. To start, preheat your oven according to the instructions on your chocolate cake mix box. You’ll need to gather the additional ingredients specified on the box, which usually include eggs, vegetable oil, and water. These are typically standard pantry staples, so you likely won’t need a special trip to the store. In a large mixing bowl, combine the cake mix with the eggs, oil, and water. Whisk or beat these ingredients together until the batter is smooth and well-combined. Avoid overmixing, as this can result in a tough cake. Once your batter is ready, pour it into a greased and floured baking pan, as per the cake mix instructions. Bake the cake for the time recommended on the box, or until a toothpick inserted into the center comes out clean. Once baked, remove the cake from the oven and allow it to cool completely in the pan. This is crucial for the next steps; a warm cake will melt the layers and make the dessert messy. Once completely cooled, carefully invert the cake onto a wire rack to finish cooling. After it has cooled thoroughly, you can crumble it into bite-sized pieces. This crumbled cake will form the “dirt” layer at the bottom of your dessert. Ensure the pieces aren’t too large, so they blend well with the other components.
Crafting the Creamy Pudding Layers
Now, let’s get to the wonderfully creamy layers that make this dirt cake so irresistible. We’ll be making two distinct pudding layers to build complexity and deliciousness. In one medium-sized bowl, combine one package of the instant chocolate pudding mix with 1 3/4 cups of milk. Whisk this mixture vigorously for about two minutes, or until the pudding begins to thicken. It’s important to whisk consistently to prevent lumps from forming. Once thickened, set this bowl aside. In a separate medium-sized bowl, repeat the same process with the second package of instant chocolate pudding mix and the remaining 1 3/4 cups of milk. Whisk until thickened and then set aside. This might seem redundant, but having two separate bowls makes assembly much smoother and ensures an even distribution of pudding throughout the dessert. The instant pudding is a fantastic shortcut, delivering that classic pudding flavor and creamy texture without the need for cooking on the stovetop. Make sure you’re using instant pudding, as the regular kind requires cooking and will not set up properly in this no-bake recipe.
Assembling the Delicious Dirt Cake
It’s time for the fun part: assembling your Oreo Dirt Cake! You’ll need a large serving dish, such as a trifle bowl, a 9×13 inch baking dish, or even individual clear glasses for a visually appealing presentation. Start by layering the crumbled chocolate cake at the bottom of your chosen dish. You want to create an even layer of cake crumbs, pressing down gently to form a solid base. Next, spoon the first batch of thickened chocolate pudding evenly over the cake layer. Don’t worry if it doesn’t reach the very edges; we have plenty of other delicious components to fill in the gaps. Now comes the decadent hot fudge sauce. Drizzle the entire 12.8 oz jar of hot fudge sauce over the pudding layer. You can be generous with this; the gooey, warm flavor of the hot fudge is a key component of the cake’s appeal. Next, take your thawed Cool Whip and spread it gently over the hot fudge layer. You want a light and fluffy layer here to provide a nice contrast in texture. Now, it’s time for the second batch of pudding. Spoon the second pudding mixture evenly over the Cool Whip layer, spreading it gently to create another smooth surface.
The Finishing Touches: Oreos and More
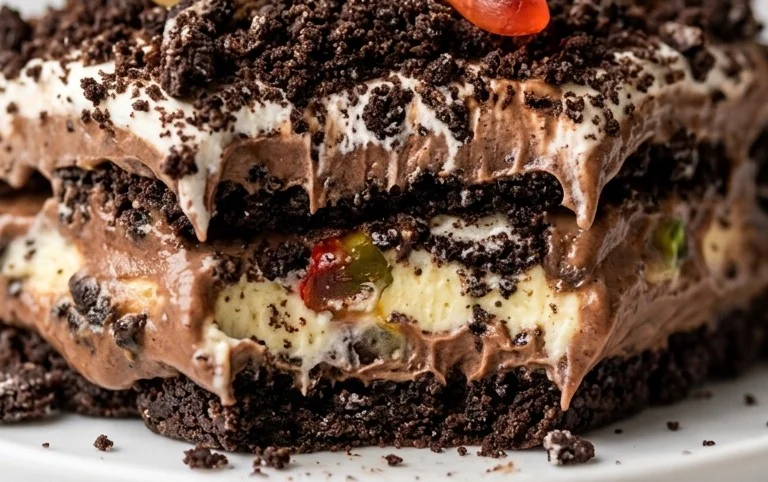
We’re in the final stages of creating our masterpiece! Take your 30 Oreo cookies and crush them into fine crumbs. You can do this by placing them in a zip-top bag and crushing them with a rolling pin, or by using a food processor. Aim for a consistency that resembles rich, dark soil. Sprinkle these crushed Oreos generously over the top of the second pudding layer. This creates the iconic “dirt” appearance of the cake and adds a delightful crunch. For an extra touch of fun and a more realistic “dirt” look, you can even add a few whole or halved Oreos on top for decoration, perhaps to resemble little rocks or to create a whimsical garden scene. If you’re feeling creative, you can also add some gummy worms peeking out of the “dirt” for a playful touch, especially if you’re making this for a kids’ party. Once all the layers are assembled and the “dirt” is in place, cover the dish tightly with plastic wrap. It’s important to refrigerate the dirt cake for at least 4 hours, or preferably overnight. This chilling time allows the flavors to meld together beautifully and the pudding to set up completely. This step is crucial for achieving the best texture and taste. When you’re ready to serve, simply remove the plastic wrap and enjoy this incredibly satisfying dessert.
Conclusion:
There you have it – the ultimate guide to creating delicious Oreo Dirt Cake! This recipe is a guaranteed crowd-pleaser, perfect for birthdays, potlucks, or just a fun family dessert. Its simplicity, coupled with the irresistible combination of creamy pudding, crushed Oreos, and sweet gummy worms, makes it a winner every time. We’ve covered everything from the basic assembly to creative twists that will elevate your Oreo Dirt Cake to new heights.
This dessert is incredibly versatile. Serve it chilled in individual cups for a charming presentation, or layer it in a large trifle dish for a show-stopping centerpiece. Don’t be afraid to get creative with your toppings! Fresh berries, whipped cream rosettes, or even a drizzle of chocolate sauce can add an extra layer of decadence. I highly encourage you to give this Oreo Dirt Cake a try; it’s so rewarding to see the smiles it brings to everyone’s faces.
Frequently Asked Questions:
Can I make Oreo Dirt Cake ahead of time?
Absolutely! In fact, making it a few hours or even a day in advance allows the flavors to meld beautifully and the cookies to soften perfectly. Just cover it tightly and store it in the refrigerator.
What other cookies can I use instead of Oreos?
While Oreos are classic, feel free to experiment! Chocolate sandwich cookies from other brands will work, or you could even try chocolate graham crackers for a slightly different texture and flavor profile. For a fun twist, consider using golden Oreos and adding green food coloring to the pudding for a “grassy” effect.
Is there a way to make this recipe dairy-free?
Yes! You can easily adapt this Oreo Dirt Cake for a dairy-free diet. Use a dairy-free chocolate pudding mix and substitute the butter in the cookie crumb layer with a dairy-free margarine. For the whipped topping, opt for a dairy-free whipped cream alternative. Just ensure your gummy worms are also dairy-free.
Oreo Dirt Cake
A decadent and fun dessert featuring layers of chocolate cake, hot fudge, creamy pudding, and crushed Oreos.
Ingredients
-
1 box chocolate cake mix (plus ingredients on back of box)
-
12.8 oz hot fudge sauce
-
3.4 oz instant chocolate pudding mix
-
1 3/4 cups milk
-
30 Oreo cookies (crushed)
-
3.4 oz instant chocolate pudding mix
-
1 3/4 cup milk
-
8 oz cool whip, thawed
Instructions
-
Step 1
Prepare the chocolate cake according to the package directions and bake. Let it cool completely. -
Step 2
While the cake cools, prepare the first batch of pudding. In a bowl, whisk together 3.4 oz instant chocolate pudding mix and 1 3/4 cups milk until thickened. -
Step 3
Crumble the cooled chocolate cake into small pieces and place it in the bottom of a large trifle dish or individual serving glasses. -
Step 4
Spread a layer of hot fudge sauce over the crumbled cake. -
Step 5
Spoon the prepared chocolate pudding over the hot fudge layer. -
Step 6
In a separate bowl, prepare the second batch of pudding by whisking together the remaining 3.4 oz instant chocolate pudding mix and 1 3/4 cup milk until thickened. -
Step 7
Gently spread the thawed Cool Whip over the pudding layer. -
Step 8
Top the Cool Whip with the crushed Oreo cookies, resembling dirt. -
Step 9
Chill the dirt cake for at least 1 hour before serving to allow the flavors to meld and the layers to set.
Important Information
Nutrition Facts (Per Serving)
It is important to consider this information as approximate and not to use it as definitive health advice.
Allergy Information
Please check ingredients for potential allergens and consult a health professional if in doubt.