Easy Peanut Butter Spider Cookies – Spooky Fun
Peanut Butter Spider Cookies are more than just a treat; they’re a delightful dive into spooky season fun and nostalgic flavors. There’s something undeniably magical about a cookie that combines the rich, comforting taste of peanut butter with a playful, Halloween-themed presentation. I remember making these as a kid, and the anticipation of transforming simple dough into creepy-crawly creatures was half the fun! What makes these Peanut Butter Spider Cookies so special is their perfect balance: a wonderfully chewy, peanut buttery base that’s universally adored, elevated by the adorable, yet slightly eerie, spider decoration. They’re not just delicious; they’re a guaranteed hit at parties, a fantastic activity for little hands (and big ones!), and the perfect way to add a touch of homemade charm to your autumn celebrations. Get ready to create some edible arachnids that everyone will be dying to get their hands on!
Peanut Butter Spider Cookies
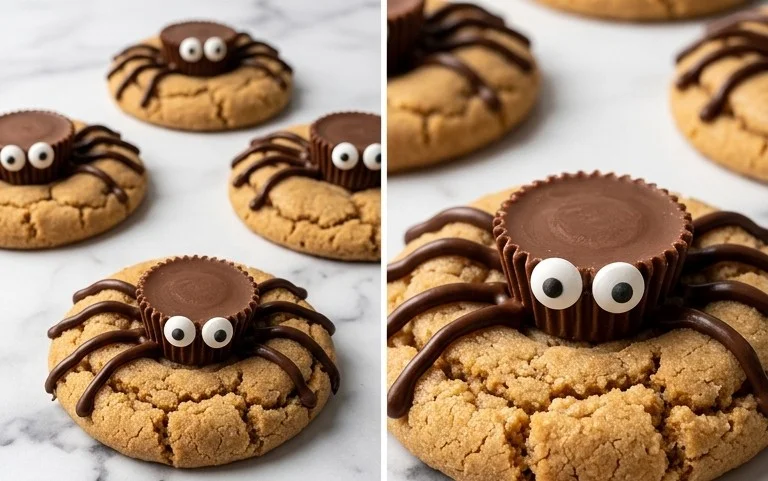
Get ready for some spooky fun in the kitchen with these adorable and utterly delicious Peanut Butter Spider Cookies! Perfect for Halloween parties, classroom treats, or just a fun afternoon baking activity, these cookies combine the irresistible flavor of peanut butter with a playful spider design. They’re surprisingly easy to make and are sure to be a hit with kids and adults alike. The base is a classic chewy peanut butter cookie, enhanced with the rich, gooey centers of mini Reese’s Peanut Butter Cups, and then decorated with chocolate “legs” and candy eyes to bring our little arachnids to life. Let’s get started and create some edible creepy crawlies!
Ingredients:
- ½ cup (113g) unsalted butter (1 stick, room temperature)
- ½ cup (107g) brown sugar
- ⅓ cup (66g) granulated sugar
- ¾ cup (201g) creamy peanut butter (not natural)
- 1 large egg
- 1 tsp vanilla extract
- 1 ½ cups (180g) all purpose flour
- 1 tsp baking soda
- ½ tsp baking powder
- ½ tsp salt
- Granulated sugar (for rolling the cookies)
- Mini Reese’s Peanut Butter Cups
- ½ cup (85g) semi-sweet chocolate chips (for melting)
- ½ tsp neutral oil (for melting)
- Candy eye balls.
Cookie Dough Preparation
The first step to creating our peanut butter spiders is to make a fantastic, chewy peanut butter cookie dough. In a large mixing bowl, cream together your softened unsalted butter, brown sugar, and granulated sugar. Using an electric mixer or a sturdy whisk, beat them until the mixture is light and fluffy. This process incorporates air into the dough, which helps create a tender cookie. Make sure your butter is truly at room temperature – it shouldn’t be melted, but soft enough to indent easily with your finger. Next, beat in the creamy peanut butter until everything is well combined and smooth. This is where the star flavor comes from, so don’t be shy! Now, add the large egg and vanilla extract. Mix these in until they are fully incorporated into the dough. A crucial tip here is to not overmix once the egg is added.
In a separate medium bowl, whisk together the all-purpose flour, baking soda, baking powder, and salt. Whisking these dry ingredients together ensures that the leavening agents and salt are evenly distributed throughout the flour, preventing pockets of saltiness or uneven rising in your cookies. Gradually add the dry ingredients to the wet ingredients, mixing on low speed or by hand just until the flour streaks disappear. Be careful not to overmix at this stage; overmixing can develop the gluten in the flour too much, resulting in tough cookies. The dough should be thick and slightly sticky.
Forming and Baking the Spider Bodies
Once your cookie dough is ready, it’s time to form our cookie bases. Scoop about 1 tablespoon of dough and roll it into a ball. For an extra touch of sweetness and a lovely finish, roll each dough ball in the granulated sugar you’ve set aside. This not only adds a delightful crunch but also helps prevent the cookies from spreading too much. Place the sugared dough balls about 2 inches apart on baking sheets lined with parchment paper. Parchment paper is your friend here, making cleanup a breeze and ensuring your cookies don’t stick.
Now comes the fun part where we create the spider’s body! Before baking, gently press a mini Reese’s Peanut Butter Cup into the center of each dough ball. Don’t push it all the way through, just enough so it’s firmly set into the dough. As the cookies bake, the Reese’s Cup will melt and become a gooey, delicious center, resembling the spider’s plump body. Bake in a preheated oven at 350°F (175°C) for 9-11 minutes, or until the edges are lightly golden brown and the centers appear slightly soft. They will continue to set as they cool. Let the cookies cool on the baking sheet for a few minutes before transferring them to a wire rack to cool completely. This is important to prevent them from breaking.
Creating the Chocolate Legs and Features
While your cookies are cooling, it’s time to prepare for the spider’s creepy crawly legs. In a microwave-safe bowl, combine the semi-sweet chocolate chips and the neutral oil. Microwave in 30-second intervals, stirring well after each interval, until the chocolate is completely melted and smooth. The oil helps the chocolate melt evenly and achieve a smooth consistency, perfect for piping. You can also melt the chocolate using a double boiler method if you prefer.
Once the chocolate is melted and smooth, transfer it into a small piping bag or a zip-top bag with a tiny corner snipped off. You can also use a toothpick or a small spoon to draw the legs, but a piping bag gives you more control. Take your completely cooled peanut butter cookies. You’ll want to be precise with your spider legs! Pipe eight thin lines of melted chocolate radiating from the melted Reese’s Peanut Butter Cup “body” of each cookie. Aim for three legs on each side and two pointing upwards, creating the classic spider look. Work quickly as the melted chocolate can start to set.
Adding the Finishing Touches and Final Assembly
The final touch that brings our peanut butter spiders to life is, of course, their eyes! Before the chocolate legs have fully set, gently press two candy eye balls onto the melted chocolate “body” (the Reese’s Peanut Butter Cup) above the piped legs. If your chocolate has already set, you can add a tiny dot of melted chocolate to the back of the candy eyes to help them stick. This gives your spiders a fun, whimsical expression.
Once all the decorations are in place, allow the chocolate to set completely. You can speed this up by placing the cookies in the refrigerator for about 10-15 minutes. And there you have it – your very own batch of spooky and delicious Peanut Butter Spider Cookies! These are sure to be a delightful addition to any Halloween celebration or simply a fun treat to enjoy anytime. They store well in an airtight container at room temperature for up to 3-4 days, though I doubt they’ll last that long! Enjoy every creepy, crawly bite!
Conclusion:
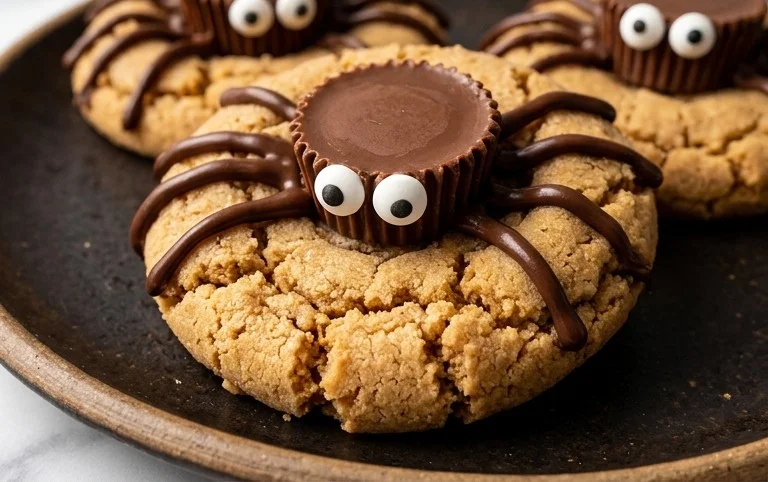
And there you have it – our delightful Peanut Butter Spider Cookies! This recipe is a fantastic way to combine the irresistible flavors of peanut butter with a fun, spooky twist, making it perfect for Halloween parties, bake sales, or just a delightful afternoon treat. They’re incredibly easy to whip up, requiring no fancy techniques, and the result is a batch of perfectly chewy, peanut buttery cookies that are sure to be a hit with kids and adults alike. The simple addition of candy eyes and licorice legs transforms them into adorable little arachnids that are almost too cute to eat!
These cookies are wonderful on their own, but they also pair beautifully with a cold glass of milk or a warm cup of hot chocolate. For variations, consider adding a sprinkle of sea salt on top before baking for a sweet and salty kick, or even drizzling some melted chocolate over the “spiders” for extra decadence. Don’t be afraid to get creative with your spider designs! I truly encourage you to give these Peanut Butter Spider Cookies a try; they’re guaranteed to bring smiles and spooky joy to your kitchen.
Frequently Asked Questions:
Can I make these cookies ahead of time?
Absolutely! You can bake the cookies and store them in an airtight container at room temperature for up to 3-4 days. You can even decorate them a day in advance.
What if I don’t have black licorice for the legs?
No problem! You can use pretzel sticks cut into smaller pieces, or even thin strips of black fondant or fruit leather if you have those on hand. Get creative with your spider legs!
Are these cookies very sweet?
The sweetness level is generally balanced, thanks to the savory peanut butter. You can adjust the sugar slightly if you prefer a less sweet cookie, but I find the current ratio to be just right.
Peanut Butter Spider Cookies
Spooky and delicious peanut butter cookies decorated with candy eyeballs and chocolate spider legs.
Ingredients
-
½ cup (113g) unsalted butter, room temperature
-
½ cup (107g) brown sugar
-
⅓ cup (66g) granulated sugar
-
¾ cup (201g) creamy peanut butter (not natural)
-
1 large egg
-
1 tsp vanilla extract
-
1 ½ cups (180g) all purpose flour
-
1 tsp baking soda
-
½ tsp baking powder
-
½ tsp salt
-
Granulated sugar, for rolling
-
Mini Reese’s Peanut Butter Cups
-
½ cup (85g) semi-sweet chocolate chips
-
½ tsp neutral oil
-
Candy eye balls
Instructions
-
Step 1
Preheat oven to 375°F (190°C). Line baking sheets with parchment paper. -
Step 2
In a large bowl, cream together the softened butter, brown sugar, and granulated sugar until light and fluffy. -
Step 3
Beat in the creamy peanut butter, egg, and vanilla extract until well combined. -
Step 4
In a separate bowl, whisk together the all purpose flour, baking soda, baking powder, and salt. -
Step 5
Gradually add the dry ingredients to the wet ingredients, mixing until just combined. Do not overmix. -
Step 6
Roll dough into 1-inch balls and then roll each ball in granulated sugar. Place on prepared baking sheets. -
Step 7
Bake for 9-11 minutes, or until the edges are lightly golden. Let cool on the baking sheets for a few minutes before transferring to a wire rack to cool completely. -
Step 8
Melt semi-sweet chocolate chips with neutral oil in a microwave-safe bowl in 30-second intervals, stirring in between, until smooth. Transfer to a piping bag or a zip-top bag with a small corner snipped off. -
Step 9
Cut Mini Reese’s Peanut Butter Cups in half. Gently press two halves into the top of each cooled cookie to form spider bodies. -
Step 10
Pipe eight thin lines of melted chocolate from the cookie base around the peanut butter cup halves to create spider legs. Immediately attach candy eyeballs to the peanut butter cup halves.
Important Information
Nutrition Facts (Per Serving)
It is important to consider this information as approximate and not to use it as definitive health advice.
Allergy Information
Please check ingredients for potential allergens and consult a health professional if in doubt.