Melt-in-Your-Mouth Mini Sugar Cookies Perfect Bite-Sized
Mini sugar cookies are a delightful little package of pure joy, aren’t they? There’s something undeniably charming about these bite-sized rounds of buttery goodness. They’re the perfect canvas for your creativity, whether you’re decorating them for a festive occasion or simply enjoying their classic, sweet flavor. People adore mini sugar cookies because they offer all the comforting, nostalgic taste of their larger counterparts, but in a perfectly portioned, more manageable size. Imagine a platter overflowing with these golden delights, each one a tiny masterpiece. What truly makes them special is their versatility; they’re perfect for a quick afternoon treat, a centerpiece for a cookie exchange, or a sweet ending to any meal. Get ready to fall in love with baking these adorable mini sugar cookies all over again.
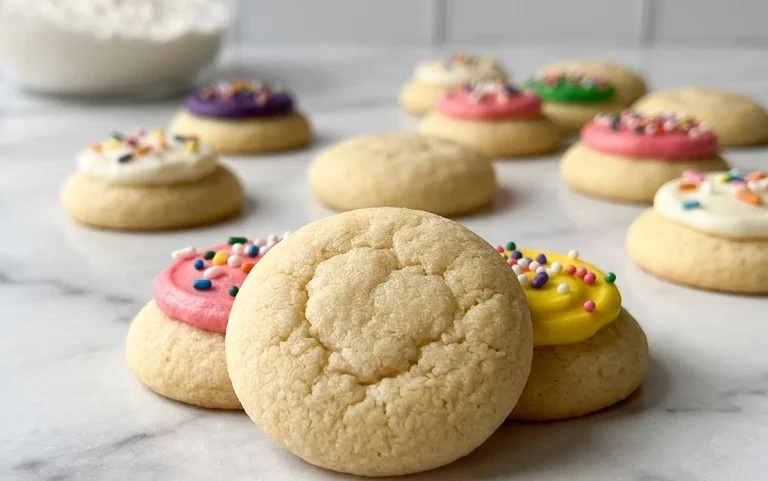
Mini Sugar Cookies
There’s something undeniably charming about mini sugar cookies. They’re perfectly bite-sized, wonderfully versatile, and bring a smile to everyone’s face, from little hands to grown-up cookie enthusiasts. These aren’t your average, everyday sugar cookies; these are the kind that melt in your mouth with a delicate crispness and a hint of delightful flavor. Whether you’re looking for a simple treat to enjoy with your afternoon tea, a festive addition to a holiday cookie platter, or a fun baking project to do with kids, these mini sugar cookies are sure to become a cherished recipe. They’re surprisingly easy to make, and the results are consistently delightful. The texture is key here – a slight crisp on the outside giving way to a tender, almost crumbly interior. And the flavor? It’s a subtle dance of vanilla and almond that complements the sweetness beautifully without being overpowering. Let’s get baking!
Ingredients:
- ½ cup (113g) unsalted butter (softened but still cool to the touch)
- ½ cup (115g) granulated sugar
- ½ cup (60g) powdered sugar
- ½ cup (108g) canola or vegetable oil
- 1¼ teaspoons pure vanilla extract
- ¼ teaspoon almond extract
- 1 large egg
- 2⅓ cups (291g) all purpose flour (spooned and leveled)
- ¾ teaspoon baking soda
- ¾ teaspoon cream of tartar
- ½ teaspoon salt
- ¾ cup (173g) granulated sugar, divided (for rolling and sprinkling)
Instructions:
- Creaming the Butter and Sugars: In a large mixing bowl, combine the softened (but still cool!) butter, ½ cup of granulated sugar, and the powdered sugar. Using an electric mixer on medium speed, beat these ingredients together until they are light and fluffy. This process, often called “creaming,” is crucial for creating a tender cookie. It incorporates air into the mixture, which will help the cookies rise and give them a pleasant texture. Don’t rush this step; it can take anywhere from 3 to 5 minutes. You’re looking for a pale yellow, airy mixture. Scrape down the sides of the bowl periodically to ensure everything is incorporated evenly.
- Adding Wet Ingredients: Once the butter and sugars are beautifully creamed, it’s time to add the other wet ingredients. Drizzle in the canola or vegetable oil, followed by the pure vanilla extract and the almond extract. Beat on medium speed until well combined. The oil helps to create a wonderfully tender and moist cookie, while the extracts provide that subtle, delightful flavor that makes these cookies so special. Next, add the large egg and beat again until just incorporated. Be careful not to overmix at this stage. Overmixing can develop the gluten in the flour too much, leading to tough cookies.
- Combining Dry Ingredients and Forming the Dough: In a separate medium bowl, whisk together the all-purpose flour, baking soda, cream of tartar, and salt. Whisking these dry ingredients together ensures they are evenly distributed, which is important for consistent leavening and flavor. Now, gradually add the dry ingredients to the wet ingredients in three additions, mixing on low speed until just combined. Mix until you no longer see streaks of flour. The dough will be soft and slightly sticky. This is normal. Gently fold in any remaining flour with a spatula if needed. The dough should come together into a cohesive ball.
- Chilling and Shaping the Cookies: This is a critical step for achieving perfectly formed mini cookies. Turn the dough out onto a lightly floured surface. Divide the dough in half. Take one half and shape it into a log, about 1 ½ inches in diameter. Wrap the log tightly in plastic wrap and repeat with the other half of the dough. Refrigerate the dough logs for at least 1 hour, or up to 2 days. Chilling the dough makes it firm enough to slice cleanly and prevents the cookies from spreading too much during baking. When you’re ready to bake, preheat your oven to 350°F (175°C). Line baking sheets with parchment paper. Unwrap one chilled dough log at a time. Using a sharp knife, slice the log into ¼-inch thick rounds.
- Rolling and Baking to Perfection: Pour the remaining ¾ cup of granulated sugar into a shallow dish. Roll each cookie slice lightly in the sugar, coating both sides. This sugar coating will give the cookies a beautiful sparkle and a delightful crunch. Place the sugared cookie slices about 1 inch apart on the prepared baking sheets. If you like, you can sprinkle a little extra granulated sugar on top of each cookie for an even more decorative finish. Bake for 9-12 minutes, or until the edges are lightly golden brown and the centers are set but still look slightly soft. The exact baking time will depend on your oven and the size of your cookies. Do not overbake! They will continue to firm up as they cool. Let the cookies cool on the baking sheets for 5 minutes before transferring them to a wire rack to cool completely. Enjoy your delightful mini sugar cookies!

Conclusion:
And there you have it – your guide to creating the most delightful mini sugar cookies! This recipe is truly a winner because it delivers perfectly crisp edges with a wonderfully tender center, all in a perfectly bite-sized package. They’re incredibly versatile and make for a fantastic addition to any celebration, holiday, or just a Tuesday afternoon pick-me-up. The simplicity of the ingredients means you likely have everything you need right in your pantry to get started. I encourage you to give these mini sugar cookies a try; you won’t be disappointed with the results, and the joy they bring is truly infectious!
Serving Suggestions: These little gems are fantastic on their own, but they also shine when decorated. Frost them with your favorite royal icing, sprinkle them with edible glitter, or even sandwich two together with a touch of buttercream. They’re perfect for cookie platters, gift-giving, or simply enjoying with a cup of tea or coffee.
Variations: Feel free to get creative! Add a pinch of cinnamon or nutmeg to the dough for a warming spice. For a citrus twist, zest half a lemon or orange into the batter. You can even experiment with adding a drop of almond extract along with the vanilla for a more complex flavor profile.
Frequently Asked Questions:
Why are my mini sugar cookies spreading too much?
Over-mixing the dough after adding the flour can develop the gluten too much, leading to spreading. Also, ensure your butter and sugar are creamed properly but not to a point where they become too liquidy. Chilling the dough for at least 30 minutes before baking is crucial for preventing excessive spread.
How can I store these mini sugar cookies?
Once completely cooled, store your mini sugar cookies in an airtight container at room temperature. They should stay fresh and delicious for up to a week. If you’ve decorated them with frosting, it’s best to separate layers with parchment paper to prevent sticking.
Can I make these cookies ahead of time?
Absolutely! The dough can be made up to 2-3 days in advance and stored, well-wrapped, in the refrigerator. You can also freeze the unbaked cookie dough balls for up to 3 months. When ready to bake, place the frozen dough balls directly onto a baking sheet and bake a few minutes longer.
Mini Sugar Cookies
Delightful and tender mini sugar cookies, perfect for any occasion. They bake up crisp on the edges and wonderfully soft in the center, with a hint of vanilla and almond. Includes sugar for rolling and sprinkling for a delightful crunch.
Ingredients
-
½ cup (113g) unsalted butter (softened but still cool to the touch)
-
½ cup (115g) granulated sugar
-
½ cup (60g) powdered sugar
-
½ cup (108g) canola or vegetable oil
-
1¼ teaspoons pure vanilla extract
-
¼ teaspoon almond extract
-
1 large egg
-
2⅓ cups (291g) all purpose flour (spooned and leveled)
-
¾ teaspoon baking soda
-
¾ teaspoon cream of tartar
-
½ teaspoon salt
-
¾ cup (173g) granulated sugar, divided (for rolling and sprinkling)
Instructions
-
Step 1
In a large bowl, cream together the softened butter, granulated sugar, and powdered sugar until light and fluffy. -
Step 2
Beat in the canola or vegetable oil, vanilla extract, almond extract, and the egg until well combined. -
Step 3
In a separate medium bowl, whisk together the all-purpose flour, baking soda, cream of tartar, and salt. -
Step 4
Gradually add the dry ingredients to the wet ingredients, mixing on low speed until just combined. Do not overmix. -
Step 5
Pour the divided granulated sugar onto a shallow plate or shallow bowl for rolling and sprinkling. Roll dough into small balls, about 1 inch in diameter. Then roll each ball in the sugar to coat. Place cookies about 2 inches apart on parchment-lined baking sheets. -
Step 6
Bake in a preheated oven at 350°F (175°C) for 8-10 minutes, or until the edges are lightly golden. They will look puffy and may not appear completely set in the center, but they will firm up as they cool. -
Step 7
Let the cookies cool on the baking sheets for a few minutes before transferring them to a wire rack to cool completely.
Important Information
Nutrition Facts (Per Serving)
It is important to consider this information as approximate and not to use it as definitive health advice.
Allergy Information
Please check ingredients for potential allergens and consult a health professional if in doubt.