Easy Caramel Apple Dessert Cups Recipe
These Caramel Apple Dessert Cups are a fantastic way to capture the essence of a crisp autumn day in a simple, handheld treat. They bring together the sweet-tartness of cooked apples, the comforting crunch of a buttery crumb crust, and layers of creamy vanilla pudding and luscious caramel. They’re perfect for parties, as a make-ahead dessert, or just when you need a little something sweet that feels special without being complicated. Ingredients: 4 cups apples (peeled and chopped) ½ cup light brown sugar 1 tsp cinnamon 2 cups vanilla wafer crumbs ¼ cup salted or unsalted butter (melted) 1 pkg instant vanilla pudding mix (3.4 ounces) 1 cup milk ⅓ cup salted caramel sauce 1 ½ cups heavy cream additional caramel sauce for garnish Preparing the Apple Filling The first step is to get your apples ready. For this recipe, I like to use a mix of sweet and tart apples, like Honeycrisp and Granny Smith, but any firm apple that holds its shape when cooked will work. You want about 4 cups of chopped apples, and it’s important to peel them first. Chop them into pieces that are roughly ½-inch to ¾-inch in size; this ensures they cook evenly and are pleasant to bite into. In a large skillet, combine the chopped apples with ½ cup of light brown sugar and 1 teaspoon of cinnamon. You’ll want to cook this mixture over medium heat. Stir it frequently. The apples will start to release their juices, and the sugar will dissolve and begin to caramelize. Cook for about 8 to 10 minutes, or until the apples are tender but still hold their shape. You don’t want them mushy. Remove from heat and let them cool completely. This cooling step is important so they don’t make the pudding layer too warm. While the apples are cooling, you can get started on the other layers of your Caramel Apple Dessert Cups.
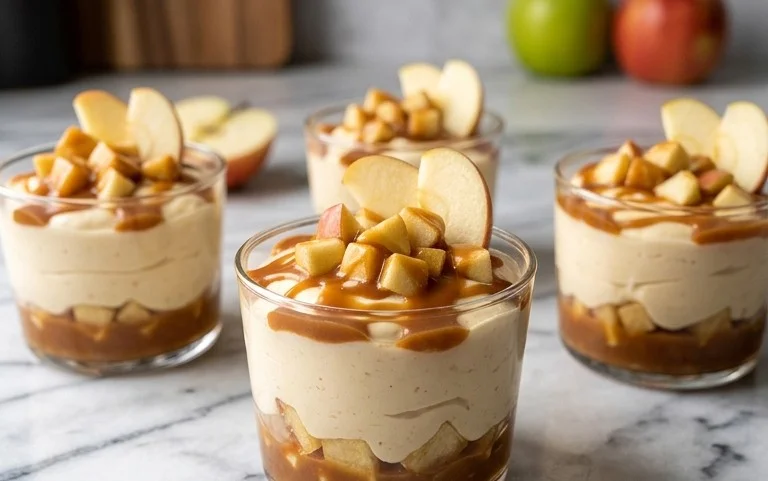
Caramel Apple Dessert Cups
These Caramel Apple Dessert Cups are a fantastic way to capture the essence of a crisp autumn day in a simple, handheld treat. They bring together the sweet-tartness of cooked apples, the comforting crunch of a buttery crumb crust, and layers of creamy vanilla pudding and luscious caramel. They’re perfect for parties, as a make-ahead dessert, or just when you need a little something sweet that feels special without being complicated.
Ingredients:
- 4 cups apples (peeled and chopped)
- ½ cup light brown sugar
- 1 tsp cinnamon
- 2 cups vanilla wafer crumbs
- ¼ cup salted or unsalted butter (melted)
- 1 pkg instant vanilla pudding mix (3.4 ounces)
- 1 cup milk
- ⅓ cup salted caramel sauce
- 1 ½ cups heavy cream
- additional caramel sauce for garnish
Preparing the Apple Filling
The first step is to get your apples ready. For this recipe, I like to use a mix of sweet and tart apples, like Honeycrisp and Granny Smith, but any firm apple that holds its shape when cooked will work. You want about 4 cups of chopped apples, and it’s important to peel them first. Chop them into pieces that are roughly ½-inch to ¾-inch in size; this ensures they cook evenly and are pleasant to bite into.
In a large skillet, combine the chopped apples with ½ cup of light brown sugar and 1 teaspoon of cinnamon. You’ll want to cook this mixture over medium heat. Stir it frequently. The apples will start to release their juices, and the sugar will dissolve and begin to caramelize. Cook for about 8 to 10 minutes, or until the apples are tender but not mushy. We’re looking for them to be softened, with some slight resistance when you bite into them. This cooking process not only softens the apples but also infuses them with that lovely cinnamon-sugar flavor. Once they’re tender, remove the skillet from the heat and let the apple mixture cool down completely. It’s important that it’s cool before you add it to the other dessert layers, otherwise, it can affect the texture of the pudding and the whipped cream.
Creating the Vanilla Wafer Crust
Next, we’ll make the crust that forms the base of our dessert cups. This is a simple, no-bake crust that gets its flavor and texture from crushed vanilla wafers. You’ll need 2 cups of vanilla wafer crumbs. The easiest way to get these is to put whole vanilla wafers into a food processor and pulse them until they are fine crumbs. If you don’t have a food processor, you can place the wafers in a sturdy zip-top bag and crush them with a rolling pin.
In a medium bowl, combine the 2 cups of vanilla wafer crumbs with ¼ cup of melted butter. If you use unsalted butter, you might want to add a tiny pinch of salt to enhance the flavors, but salted butter works perfectly well here too. Stir everything together until the crumbs are evenly moistened. This mixture should hold together when you press it. You’ll press this crumb mixture into the bottom of your dessert cups or glasses. I like to use small parfait glasses or even clear plastic cups for individual servings. You can use the back of a spoon or a small tamper to firmly press the crumbs into an even layer at the bottom. This gives you a nice, stable base for the layers to come.
Assembling the Dessert Cups
Now for the fun part: layering! This recipe uses instant vanilla pudding, which is wonderfully easy to make. You’ll need 1 package of instant vanilla pudding mix (typically 3.4 ounces) and 1 cup of milk. Pour the milk into a medium bowl and sprinkle the pudding mix over the top. Whisk it vigorously for about 2 minutes, or until it starts to thicken. Let it sit for about 5 minutes to fully set. Instant pudding is designed to set quickly, so don’t be tempted to add more milk. A slightly thicker pudding will hold its shape better between the layers.
Once the pudding has set and the apples are cool, it’s time to layer. Start by spooning a layer of the cooled cooked apples over the vanilla wafer crust in each cup. Don’t overload it, you want enough to get that apple flavor in every bite, but leave room for the pudding and cream. Next, spoon a generous layer of the prepared vanilla pudding over the apples. Smooth the top of the pudding layer with the back of a spoon.
Adding the Creamy Caramel Layers
The final layers bring in the richness of caramel and cream. For the caramel layer, gently warm ⅓ cup of salted caramel sauce just slightly. You want it to be pourable but not hot. Drizzle this warmed caramel sauce over the vanilla pudding layer in each cup. You don’t need to cover the entire surface perfectly; a nice swirl or drizzle looks appealing.
Then, in a separate, clean bowl, whip 1 ½ cups of heavy cream until medium peaks form. Be careful not to over-whip it, as you don’t want a grainy texture. It should be thick enough to hold its shape but still soft. Spoon or pipe this whipped cream over the caramel sauce layer. You can create a nice swirl or a neat dollop on top.
Finishing Touches and Serving
To complete the Caramel Apple Dessert Cups, drizzle a little more salted caramel sauce over the whipped cream. This adds an extra punch of caramel flavor and makes the desserts look even more appealing. You could also add a sprinkle of cinnamon or a small chopped nut like pecans if you like, but the caramel drizzle is the star.
These dessert cups are best chilled before serving. Refrigerate them for at least 30 minutes to allow the flavors to meld and the layers to firm up. They can be made several hours ahead of time, making them a convenient option for gatherings. Store any leftovers tightly covered in the refrigerator. They typically keep well for 2-3 days, though the crust might soften slightly over time. Enjoy these delightful layers of texture and flavor!
Conclusion:
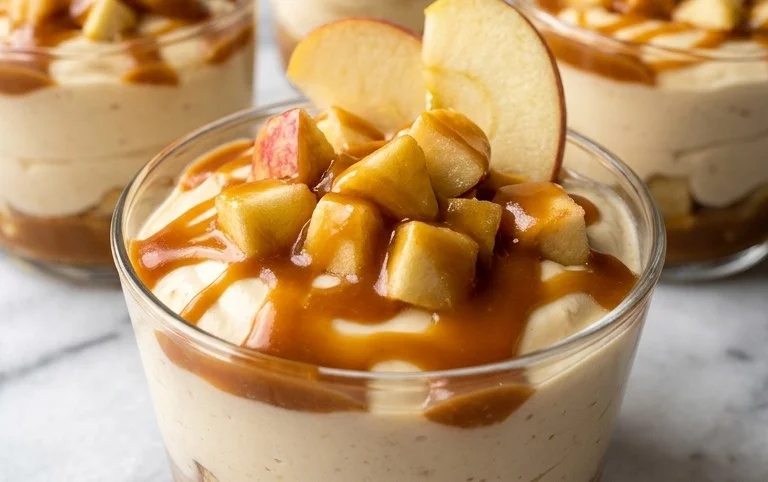
These Caramel Apple Dessert Cups are a winner because they pack so much flavor and texture into a small package. The warm, spiced apples, the creamy vanilla pudding, the crunchy wafer crust, and the gooey caramel all come together perfectly. They’re surprisingly easy to make and look so impressive. Serve them chilled for a refreshing treat, or slightly warmed if you want to emphasize the cozy apple flavor. They work great for potlucks because you can make them ahead and they travel well in individual cups. If you want to change things up, try adding a sprinkle of chopped pecans or walnuts on top of the caramel layer for extra crunch. You could also swap the vanilla pudding for a butterscotch flavor to complement the caramel. Another idea is to use gingersnap cookie crumbs instead of vanilla wafers for a spicier crust. Making these Caramel Apple Dessert Cups is a simple way to impress your friends and family. Don’t be afraid to experiment with toppings or variations to make them your own!
Frequently Asked Questions:
Can I make these dessert cups ahead of time?
Yes, absolutely. You can assemble the entire dessert cups a day in advance. Store them covered in the refrigerator. The crust might soften slightly, but it will still be delicious. The flavors actually meld together even more, which can be a good thing.
What kind of apples are best for this recipe?
Using a mix of apples like Honeycrisp and Granny Smith gives you a good balance of sweet and tart. However, any firm apple that holds its shape well when cooked, such as Fuji, Gala, or Braeburn, will work well. Avoid very soft apples that tend to turn to mush.
How long do these cups last in the fridge?
They are best enjoyed within 2-3 days of making them. After that, the crust can get too soggy and the apples might become a bit too soft.
Caramel Apple Dessert Cups
Delicious individual dessert cups layered with spiced apples, creamy vanilla pudding, and a crunchy vanilla wafer crust, topped with decadent caramel sauce.
Ingredients
-
4 cups apples (peeled and chopped)
-
½ cup light brown sugar
-
1 tsp cinnamon
-
2 cups vanilla wafer crumbs
-
¼ cup salted or unsalted butter (melted)
-
1 pkg instant vanilla pudding mix (3.4 ounces)
-
1 cup milk
-
⅓ cup salted caramel sauce
-
1 ½ cups heavy cream
-
additional caramel sauce for garnish
Instructions
-
Step 1
In a medium saucepan, combine the chopped apples, light brown sugar, and cinnamon. Cook over medium heat, stirring occasionally, until the apples are tender and the sauce has thickened, about 8-10 minutes. Set aside to cool. -
Step 2
In a bowl, combine the vanilla wafer crumbs and melted butter. Press about 2 tablespoons of the crumb mixture into the bottom of each serving cup or small glass. -
Step 3
In a separate bowl, whisk together the instant vanilla pudding mix and milk according to package directions until thickened. Stir in ⅓ cup of salted caramel sauce until well combined. -
Step 4
In another bowl, whip the heavy cream until stiff peaks form. Gently fold the whipped cream into the pudding mixture. -
Step 5
Spoon a layer of the cooked apple mixture over the wafer crust in each cup. Top with a generous dollop of the caramel pudding mixture. -
Step 6
Drizzle additional caramel sauce over the top of each dessert cup for garnish. Chill for at least 30 minutes before serving.
Important Information
Nutrition Facts (Per Serving)
It is important to consider this information as approximate and not to use it as definitive health advice.
Allergy Information
Please check ingredients for potential allergens and consult a health professional if in doubt.